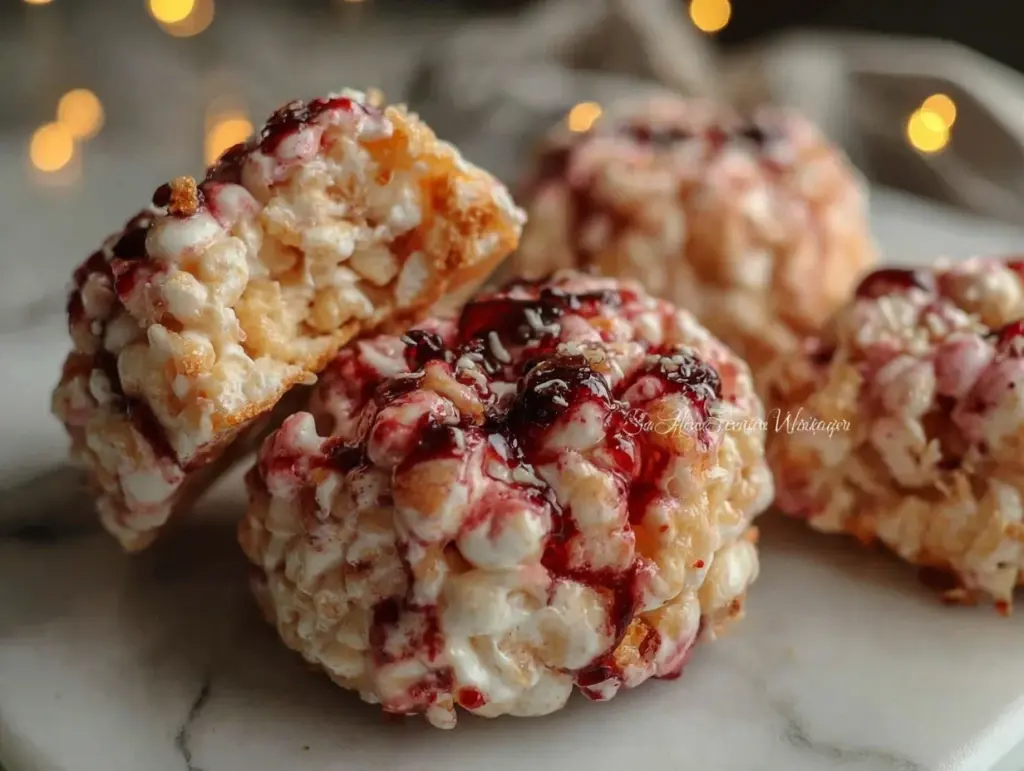
Halloween is the perfect time to get creative in the kitchen, and these Spooky Zombie Brain Rice Krispie Treats are just the thing to thrill your family and friends! Imagine a tray of eerie, brain-shaped treats with gooey, marshmallow-y deliciousness that’s as fun to make as it is to eat. These creepy yet sweet snacks are perfect for Halloween parties, movie nights, or a fun weekend activity with the kids. Trust me, you’ll be the star of any spooky celebration with these treats!
I first made these on a whim when my kids wanted something “gross and cool” for their Halloween party at school. I wasn’t sure how they’d turn out, but they ended up being the hit of the party. Plus, they’re surprisingly simple to make, so you don’t have to worry about spending hours in the kitchen. Let’s dive into the details of this hair-raisingly fun recipe!
Why You’ll Love This Recipe
- Perfect for Halloween: These Spooky Zombie Brain Rice Krispie Treats are just creepy enough to fit the spooky season while still being totally delicious and fun!
- Kid-Friendly: Whether you’re making them with your little ones or serving them to a crowd of kids, these treats are sure to be a hit.
- Easy to Make: No special baking skills are needed. If you can make regular Rice Krispie treats, you can make these spooky brains!
- Customizable: You can get creative with food coloring, toppings, and decorations to make them as creepy (or cute) as you want.
Not only do these treats taste amazing, but they also make for a show-stopping centerpiece at your Halloween party.
What makes this recipe truly unique is the way we shape the treats into creepy brain-like mounds, plus the added drizzles of “blood” (don’t worry—it’s just colored icing!). It’s the perfect combination of spooky and sweet. And honestly, you’ll love the looks on everyone’s faces when they see these sitting on the table!
What Ingredients You Will Need
This recipe uses simple, easy-to-find ingredients that you probably already have in your pantry. Here’s what you’ll need:
- Rice Krispies cereal: The star ingredient for that classic crispy texture.
- Mini marshmallows: These melt beautifully to create the gooey base for your treats.
- Unsalted butter: Adds richness and helps the marshmallows melt smoothly.
- Red food coloring: To give the marshmallows the signature zombie brain hue.
- Green food coloring: Optional for adding extra creepiness to the brains.
- Vanilla extract: Just a splash to enhance the sweet flavor.
- Powdered sugar: For making the “bloody” icing.
- Milk: Helps thin out the icing to the perfect drizzle consistency.
- Red gel food coloring: For creating the blood-like drizzle effect.
Feel free to swap out the butter for a plant-based alternative if you’re making these dairy-free. You can also use gluten-free Rice Krispies cereal if needed. Don’t have red gel food coloring? No problem—regular liquid food coloring works too, though the color may be less vibrant.
Equipment Needed
Here’s what you’ll need to whip up these spooky Halloween treats:
- Large saucepan: For melting the butter and marshmallows.
- Wooden spoon or silicone spatula: Essential for stirring your gooey mixture.
- Mixing bowl: To combine your Rice Krispies cereal with the melted marshmallow mixture.
- Baking sheet or tray: To shape and cool your zombie brains.
- Wax or parchment paper: Helps prevent sticking.
- Small bowl: For mixing the icing drizzle.
- Plastic gloves: Optional, but very helpful for shaping the sticky treats without making a mess!
If you don’t have plastic gloves, you can grease your hands with a little butter or cooking spray to make the shaping process easier. And if you don’t have food coloring, you could try using natural alternatives like beet juice for red coloring!
Preparation Method

- Prepare your workspace: Line a baking sheet with wax or parchment paper to prevent sticking. Set out all your ingredients and tools so you’re ready to go.
- Melt the butter and marshmallows: In a large saucepan, melt 4 tablespoons (56g) of unsalted butter over low heat. Once melted, add 10 ounces (283g) of mini marshmallows and stir continuously until smooth.
- Add food coloring: Remove the saucepan from heat and stir in 1 teaspoon of vanilla extract. Add a few drops of red food coloring to the melted marshmallow mixture until it reaches a brain-like pink color. If desired, you can add a drop of green food coloring for an extra creepy touch.
- Mix in the cereal: Pour 6 cups (150g) of Rice Krispies cereal into a large mixing bowl. Slowly pour the melted marshmallow mixture over the cereal and stir until well combined.
- Shape the brains: With greased hands or plastic gloves, scoop out small handfuls of the mixture and shape them into brain-like mounds. Place each brain onto the prepared baking sheet.
- Let them set: Allow the shaped treats to cool and set for about 30 minutes at room temperature.
- Make the bloody drizzle: In a small bowl, mix 1 cup (120g) of powdered sugar with 1-2 tablespoons (15-30ml) of milk until smooth. Add red gel food coloring to achieve a blood-red color.
- Decorate the brains: Use a small spoon or piping bag to drizzle the red icing over the brains to create a gory effect.
- Serve and enjoy: Once the icing has set, your Spooky Zombie Brain Rice Krispie Treats are ready to serve!
If the mixture is too sticky to work with, try chilling it for a few minutes before shaping. And remember, the brains don’t have to be perfect—zombie brains are supposed to look a little messy!
Cooking Tips & Techniques
Making Spooky Zombie Brain Rice Krispie Treats is pretty straightforward, but here are a few tips to ensure success:
- Don’t overheat the marshmallows: Keep the heat low and stir constantly. Overheating can make the mixture hard to work with.
- Use gloves or grease your hands: The marshmallow mixture is super sticky, so plastic gloves or a little butter on your hands will help you shape the brains more easily.
- Work quickly: Once the mixture is combined, it starts to set fast. Have your baking sheet ready and shape the brains immediately.
- Add extra details: For an even creepier look, use black gel icing to draw lines or veins on the brains after the red drizzle sets.
- Keep it fun: Let the kids help with shaping the brains—they’ll love getting their hands sticky and creative!
Variations & Adaptations
Want to mix things up? Here are some fun variations:
- Gluten-Free: Use a gluten-free cereal alternative like puffed rice.
- Vegan Option: Swap butter for vegan margarine and use vegan marshmallows.
- Colorful Brains: Experiment with different food colorings to make green or purple brains.
- Chocolate Drizzle: Skip the red icing and drizzle melted chocolate for a less spooky but equally delicious version.
- Seasonal Twist: Add pumpkin spice to the marshmallow mixture for a fall-inspired flavor.
One time, I even added gummy worms inside the brains for an extra creepy surprise—it was a huge hit with the kids!
Serving & Storage Suggestions
These treats are best served at room temperature, and they make a fantastic centerpiece for your Halloween table! Pair them with spooky-themed drinks like “witch’s brew” punch or pumpkin spice lattes.
Store any leftovers in an airtight container at room temperature for up to 3 days. If you want to make them ahead of time, you can freeze the shaped brains (without the icing drizzle) for up to a month. Just thaw them at room temperature and add the drizzle before serving.
Nutritional Information & Benefits
Here’s an approximate nutritional breakdown per treat:
- Calories: 120
- Fat: 3g
- Carbohydrates: 22g
- Sugar: 15g
- Protein: 1g
While these treats are definitely indulgent, they’re a fun way to celebrate Halloween without going overboard. Plus, they’re nut-free and can be adapted for dietary restrictions like gluten-free or vegan!
Conclusion
These Spooky Zombie Brain Rice Krispie Treats are the perfect combination of fun, creepy, and delicious. Whether you’re hosting a Halloween bash or just looking for a creative activity with the kids, this recipe is sure to be a hit. The gooey texture and spooky presentation make them unforgettable—and so easy to make!
Give this recipe a try and let me know in the comments how your zombie brains turned out. Don’t forget to share photos of your creations—I’d love to see how spooky and creative you get! Happy Halloween!
FAQs
Can I use regular marshmallows instead of mini marshmallows?
Yes, you can! Just make sure to cut them into smaller pieces so they melt evenly.
How far in advance can I make these treats?
You can make them up to 2 days in advance. Store them in an airtight container at room temperature.
Can I use natural food coloring?
Absolutely! Try using beet juice for red coloring or matcha powder for green.
Do I need to refrigerate these treats?
Nope! They’re best stored at room temperature so they stay soft and chewy.
What if the marshmallow mixture is too sticky to shape?
Let it cool for a few minutes or grease your hands with butter to make shaping easier.
Pin This Recipe!

Spooky Zombie Brain Rice Krispie Treats for Easy Halloween Fun

These creepy yet sweet snacks are perfect for Halloween parties, movie nights, or a fun weekend activity with the kids. They’re surprisingly simple to make and will be the hit of any spooky celebration!
- Prep Time: 15 minutes
- Cook Time: 10 minutes
- Total Time: 55 minutes
- Yield: 12 treats 1x
- Category: Dessert
- Cuisine: American
Ingredients
- 6 cups Rice Krispies cereal
- 10 ounces mini marshmallows
- 4 tablespoons unsalted butter
- Red food coloring
- Green food coloring (optional)
- 1 teaspoon vanilla extract
- 1 cup powdered sugar
- 1–2 tablespoons milk
- Red gel food coloring
Instructions
- Prepare your workspace: Line a baking sheet with wax or parchment paper and set out all your ingredients and tools.
- Melt the butter and marshmallows: In a large saucepan, melt 4 tablespoons of unsalted butter over low heat. Add 10 ounces of mini marshmallows and stir continuously until smooth.
- Add food coloring: Remove the saucepan from heat and stir in 1 teaspoon of vanilla extract. Add a few drops of red food coloring until the mixture reaches a brain-like pink color. Optionally, add a drop of green food coloring for extra creepiness.
- Mix in the cereal: Pour 6 cups of Rice Krispies cereal into a large mixing bowl. Slowly pour the melted marshmallow mixture over the cereal and stir until well combined.
- Shape the brains: With greased hands or plastic gloves, scoop out small handfuls of the mixture and shape them into brain-like mounds. Place each brain onto the prepared baking sheet.
- Let them set: Allow the shaped treats to cool and set for about 30 minutes at room temperature.
- Make the bloody drizzle: In a small bowl, mix 1 cup of powdered sugar with 1-2 tablespoons of milk until smooth. Add red gel food coloring to achieve a blood-red color.
- Decorate the brains: Use a small spoon or piping bag to drizzle the red icing over the brains to create a gory effect.
- Serve and enjoy: Once the icing has set, your Spooky Zombie Brain Rice Krispie Treats are ready to serve!
Notes
[‘Don’t overheat the marshmallows to avoid making the mixture hard to work with.’, ‘Use gloves or grease your hands to shape the sticky mixture easily.’, ‘Work quickly as the mixture sets fast.’, ‘Add extra details like black gel icing for veins or lines on the brains.’, ‘Let kids help with shaping the brains for a fun activity.’]
Nutrition
- Serving Size: 1 treat
- Calories: 120
- Sugar: 15
- Sodium: 90
- Fat: 3
- Saturated Fat: 1.5
- Carbohydrates: 22
- Protein: 1
Keywords: Halloween, spooky treats, Rice Krispie treats, zombie brains, Halloween dessert, kid-friendly, easy recipe