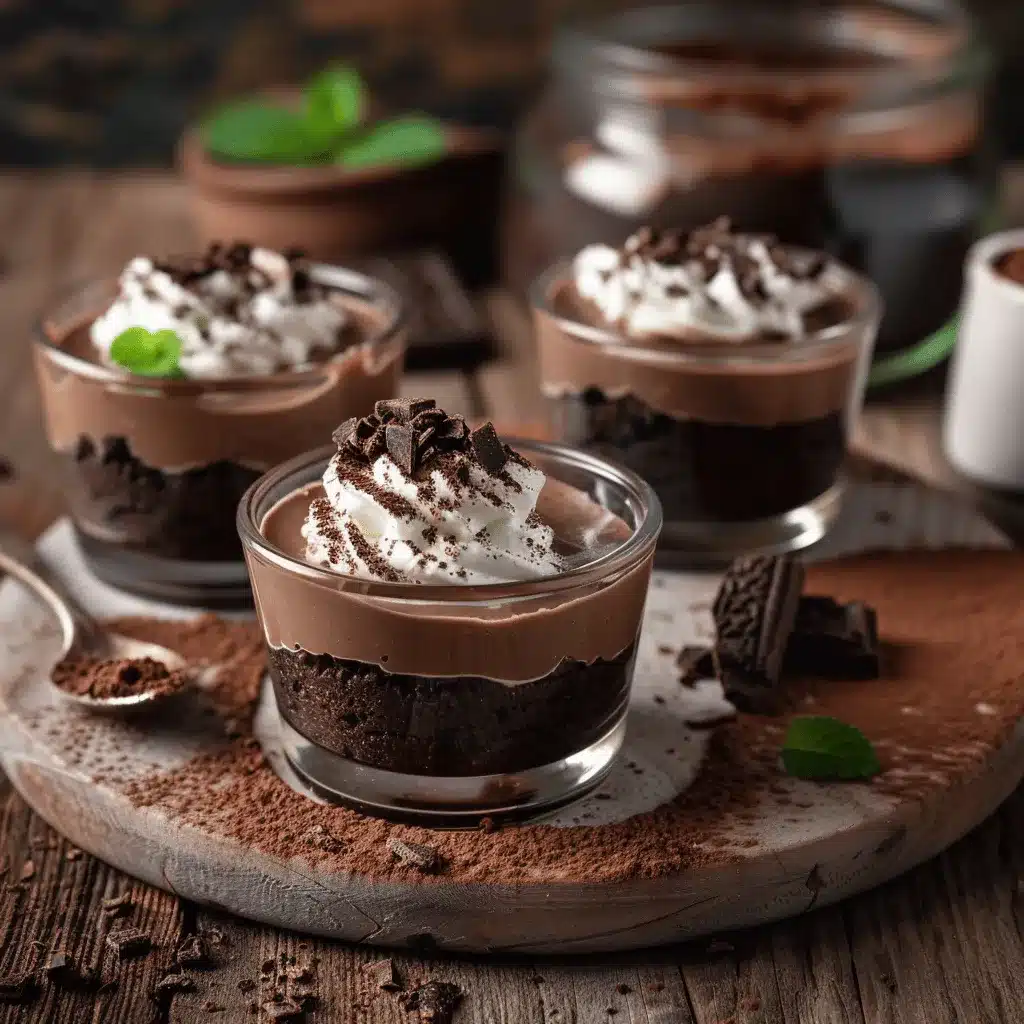
The first time I made these Mini Triple Chocolate Mousse Cups with an Oreo crust, I swear it felt like I’d unlocked dessert perfection. Imagine this: a buttery, crunchy Oreo base, three layers of velvety chocolate mousse ranging from dark to white, and a finishing touch of whipped cream and chocolate shavings. They’re rich, indulgent, and just the right size to satisfy your sweet tooth without going overboard. Plus, they’re as fun to make as they are to eat!
These mini mousse cups are perfect for entertaining because they look fancy, but they’re surprisingly easy to assemble. Whether it’s a date night, a dinner party, or just a treat-yourself kind of day, these little cups of joy are sure to impress. So grab your mixing bowls, and let’s whip up some magic!
Why You’ll Love This Recipe
- Easy Elegance: These mini mousse cups look like they came from a high-end patisserie, but you can make them right at home with simple ingredients.
- Triple Chocolate Goodness: Dark, milk, and white chocolate layers combine to create an irresistible flavor trifecta.
- Mini Portions: Perfectly portioned for individual servings, making them great for parties or portion control.
- No-Bake Recipe: No need to turn on the oven—these mousse cups set beautifully in the fridge.
- Customizable: Swap out the Oreo crust for graham crackers or add a splash of liqueur to the mousse for an adult twist.
- Kid-Friendly: Not only do kids love eating these, but they’ll also enjoy helping you layer the mousse!
What sets this recipe apart is its balance of textures and flavors. The crunchy Oreo crust contrasts beautifully with the silky mousse layers, while the sweetness is perfectly tempered by the richness of the chocolate. Trust me, one bite will have you hooked.
What Ingredients You Will Need
This recipe uses simple, easy-to-find ingredients that combine to create an indulgent dessert. Here’s what you’ll need:
- Oreo cookies: About 20 cookies, crushed into fine crumbs (no filling needed).
- Unsalted butter: Melted, to bind the Oreo crust.
- Dark chocolate: High-quality dark chocolate, chopped (70% cocoa works best).
- Milk chocolate: For the second mousse layer—smooth and creamy.
- White chocolate: Adds a sweet and creamy finish to the top layer.
- Heavy cream: Whipped to soft peaks for the mousse layers.
- Powdered sugar: Just a touch to sweeten the whipped cream.
- Gelatin: Unflavored gelatin to help the mousse set properly.
- Vanilla extract: Adds a subtle depth of flavor to the mousse.
- Whipped cream and chocolate shavings: For garnish. Optional, but so worth it!
Don’t have Oreos? No problem—graham crackers or even digestive biscuits work as a crust alternative. And if you’re gluten-free, you can use gluten-free chocolate sandwich cookies instead!
Equipment Needed
- Food processor: For crushing the Oreos into fine crumbs.
- Mixing bowls: You’ll need a few for whipping cream and melting chocolate.
- Microwave or double boiler: To gently melt the chocolate without burning it.
- Small glasses or cups: For assembling the mousse cups. Shot glasses or small dessert cups work perfectly.
- Whisk or electric mixer: To whip the cream to soft peaks.
- Piping bags: Optional, but they make layering the mousse much easier.
If you don’t have a food processor, you can crush the Oreos by placing them in a zip-top bag and smashing them with a rolling pin. And if you don’t have piping bags, just use a spoon to layer the mousse—it’ll still look gorgeous!
Preparation Method
- Make the Oreo crust: Crush the Oreos into fine crumbs using a food processor. Mix with melted butter until the crumbs resemble wet sand. Press about 1–2 tablespoons of the mixture into the bottom of each cup, pressing firmly. Chill in the fridge while you prepare the mousse.
- Melt the dark chocolate: Gently melt the dark chocolate in the microwave or over a double boiler. Let it cool slightly.
- Prepare the dark chocolate mousse: Whip 1 cup of heavy cream with 1 tablespoon powdered sugar until soft peaks form. Gently fold the whipped cream into the melted dark chocolate until smooth. Spoon or pipe onto the Oreo crust layer and refrigerate for 15 minutes.
- Repeat for milk chocolate: Melt the milk chocolate and allow it to cool slightly. Whip another cup of cream with powdered sugar, and fold into the milk chocolate. Add this layer on top of the dark chocolate mousse. Chill again for 15 minutes.
- Finish with white chocolate: Melt the white chocolate, let it cool, and whip the final cup of cream. Fold together and layer on top of the milk chocolate mousse. Refrigerate for at least 2 hours or until set.
- Add garnishes: Just before serving, top each mousse cup with a dollop of whipped cream and sprinkle with chocolate shavings.
Pro tip: If your chocolate starts to seize while melting, add a splash of heavy cream to smooth it out!
Cooking Tips & Techniques
- Chill between layers: Allowing each mousse layer to set in the fridge prevents them from mixing together.
- Use high-quality chocolate: The flavor of the mousse depends on the chocolate, so splurge on the good stuff if you can.
- Don’t overwhip the cream: Soft peaks are key to keeping the mousse light and airy. Overwhipping can make it grainy.
- Prep ahead: These mousse cups are ideal for making a day in advance, as the flavors develop beautifully in the fridge.
Making mousse might sound intimidating, but once you’ve done it a couple of times, it’s a breeze. The key is to work quickly but gently when folding the whipped cream into the chocolate.
Variations & Adaptations
- Gluten-Free: Use gluten-free chocolate sandwich cookies for the crust.
- Alcohol-Infused: Add a tablespoon of coffee liqueur or orange liqueur to each chocolate layer for a boozy twist.
- Seasonal Flavors: Add a touch of peppermint extract to the white chocolate mousse for a festive holiday version.
- Dairy-Free: Use dairy-free chocolate and coconut cream as a substitute for heavy cream.
I once tried adding a layer of raspberry puree between the mousse layers, and it added such a fresh pop of flavor. Feel free to experiment and make this recipe your own!
Serving & Storage Suggestions
These mini mousse cups are best served chilled. Present them in clear glass cups to show off the beautiful layers, and garnish with a swirl of whipped cream and chocolate shavings for a touch of elegance.
If you have leftovers (unlikely!), you can store them in the fridge for up to 3 days. Just cover them with plastic wrap to keep them fresh. For longer storage, freeze them for up to 2 weeks—just thaw in the fridge for a few hours before serving.
Nutritional Information & Benefits
While this is definitely an indulgent dessert, it’s worth noting that dark chocolate is rich in antioxidants and can even have mood-boosting properties. Each mousse cup is approximately 300–350 calories, depending on portion size and garnishes.
If you’re watching your sugar intake, you can use sugar-free chocolate and adjust the sweetness of the whipped cream accordingly.
Conclusion
If you’re looking for a dessert that’s impressive, indulgent, and downright delicious, these Mini Triple Chocolate Mousse Cups with Oreo Crust are the way to go. They’re a little bit of work, but the results are so worth it.
I’d love to hear how yours turn out! Did you try any fun variations? Drop a comment below or share your creations on social media. Happy layering!
FAQs
Can I make this recipe ahead of time?
Yes! These mousse cups can be made a day in advance and stored in the fridge until ready to serve.
What can I use instead of Oreos for the crust?
You can substitute graham crackers, digestive biscuits, or even a gluten-free alternative for the crust.
Can I skip the gelatin?
The gelatin helps the mousse set properly, but you can omit it if you prefer a softer texture.
How do I prevent my chocolate from seizing?
Make sure your chocolate is melted gently and isn’t exposed to water. Adding a splash of cream can help smooth it out if it starts to seize.
Can I freeze these mousse cups?
Absolutely! Freeze them for up to 2 weeks, and thaw in the fridge for a few hours before serving.
Pin This Recipe!

Decadent Mini Chocolate Mousse Cups Recipe with Oreo Crust

Rich, indulgent mini mousse cups with a buttery Oreo crust and three layers of velvety chocolate mousse, perfect for entertaining or treating yourself.
- Prep Time: 30 minutes
- Cook Time: 2 hours
- Total Time: 2 hours 30 minutes
- Yield: 6 servings 1x
- Category: Dessert
- Cuisine: American
Ingredients
- 20 Oreo cookies, crushed into fine crumbs (no filling needed)
- 4 tablespoons unsalted butter, melted
- 4 ounces dark chocolate, chopped
- 4 ounces milk chocolate, chopped
- 4 ounces white chocolate, chopped
- 3 cups heavy cream
- 3 tablespoons powdered sugar
- 1 tablespoon unflavored gelatin
- 1 teaspoon vanilla extract
- Whipped cream and chocolate shavings for garnish (optional)
Instructions
- Crush the Oreos into fine crumbs using a food processor. Mix with melted butter until the crumbs resemble wet sand. Press about 1–2 tablespoons of the mixture into the bottom of each cup, pressing firmly. Chill in the fridge while you prepare the mousse.
- Gently melt the dark chocolate in the microwave or over a double boiler. Let it cool slightly.
- Whip 1 cup of heavy cream with 1 tablespoon powdered sugar until soft peaks form. Gently fold the whipped cream into the melted dark chocolate until smooth. Spoon or pipe onto the Oreo crust layer and refrigerate for 15 minutes.
- Melt the milk chocolate and allow it to cool slightly. Whip another cup of cream with powdered sugar, and fold into the milk chocolate. Add this layer on top of the dark chocolate mousse. Chill again for 15 minutes.
- Melt the white chocolate, let it cool, and whip the final cup of cream. Fold together and layer on top of the milk chocolate mousse. Refrigerate for at least 2 hours or until set.
- Just before serving, top each mousse cup with a dollop of whipped cream and sprinkle with chocolate shavings.
Notes
Chill each mousse layer before adding the next to prevent mixing. Use high-quality chocolate for the best flavor. These mousse cups can be made a day in advance for convenience.
Nutrition
- Serving Size: 1 mousse cup
- Calories: 350
- Sugar: 25
- Sodium: 150
- Fat: 22
- Saturated Fat: 14
- Carbohydrates: 32
- Fiber: 2
- Protein: 4
Keywords: Chocolate mousse, Oreo crust, No-bake dessert, Mini desserts, Triple chocolate, Party dessert