Ever had one of those days when you can’t decide if you want something rich and creamy or crave a sweet-salty snack? The first time I whipped up these mini maple bacon cheesecakes, I was standing in my tiny kitchen, staring at leftover bacon and a half-empty bottle of maple syrup. You know how inspiration sometimes just sort of jumps out? That’s what happened here—and honestly, I’ve never looked back.
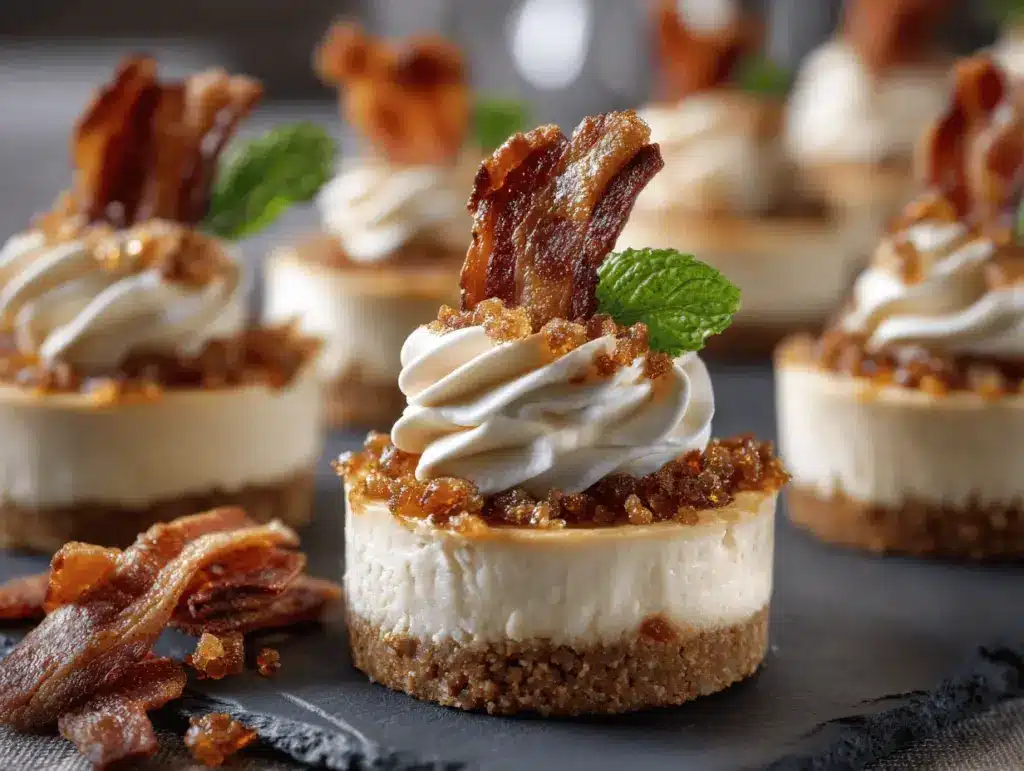
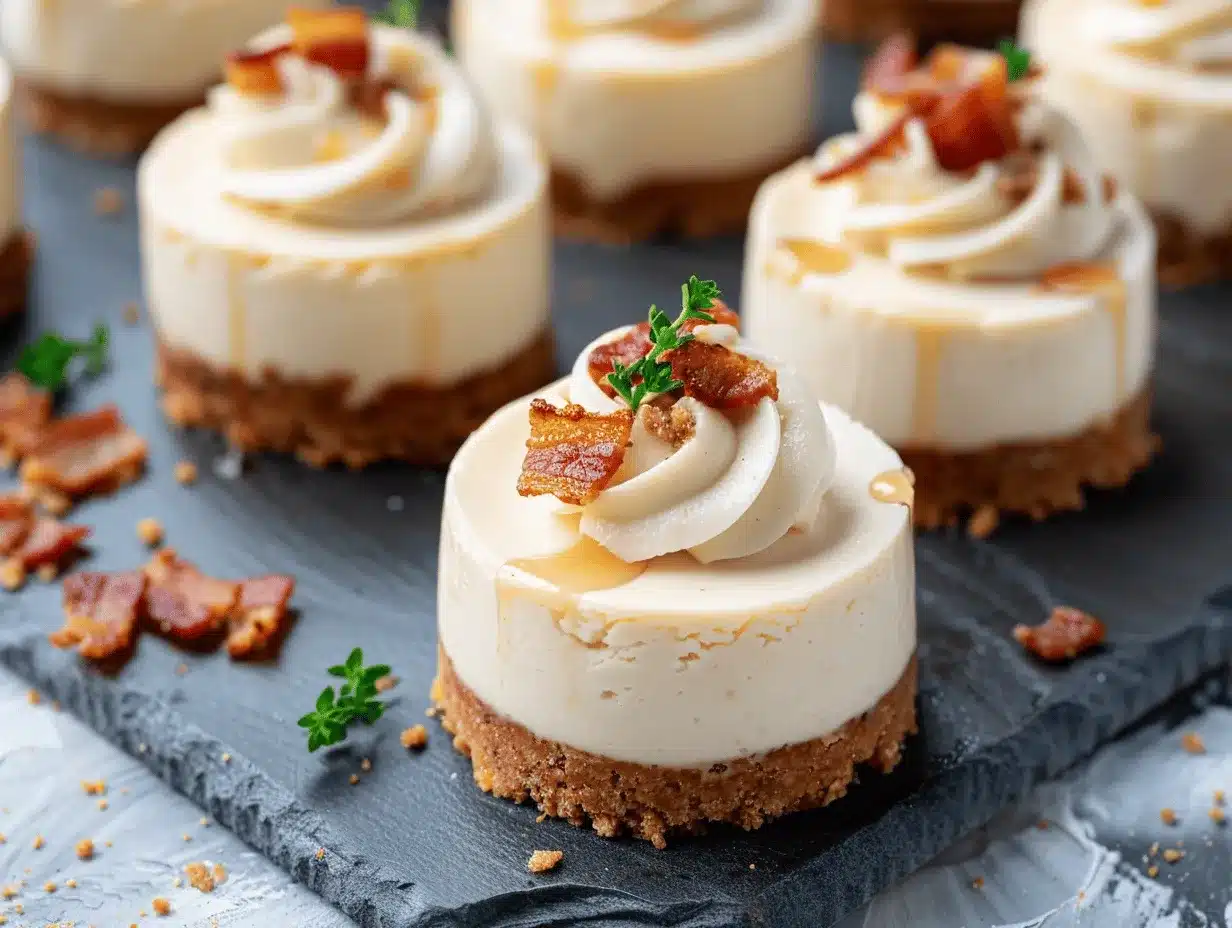
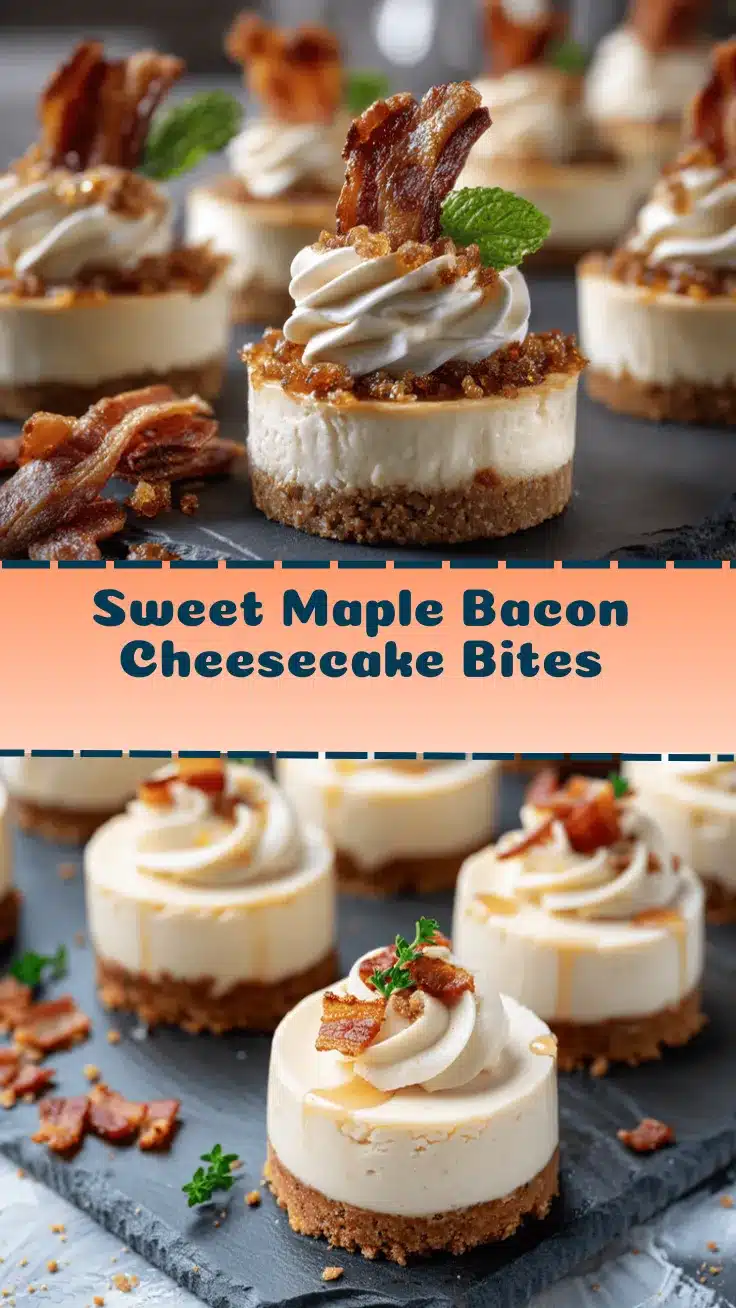
Picture this: a buttery graham cracker crust, silky maple-kissed cheesecake filling, and crispy bacon crumbles all tucked into a bite-sized treat. The aroma alone will drag every neighbor into your kitchen (I swear, my dog hovered by the oven for the entire bake time). Maple bacon cheesecakes aren’t your average dessert—they’re a little bit breakfast, a little bit party, and completely irresistible. Whether you’re making them for a holiday brunch, a cozy weekend, or a Pinterest-worthy potluck, they fit right in.
I’ve tested this recipe more times than I can count (my family doesn’t mind being taste testers, trust me). Each batch gets a little tweak—sometimes a pinch more maple, sometimes an extra crisp on the bacon. What I love most is how these mini cheesecakes bring together salty, sweet, creamy, and crunchy in one perfect package. They’re easy to share and even easier to love. So, if you’re looking for something deliciously different, these mini maple bacon cheesecakes are about to become your new favorite.
Why You’ll Love This Recipe
- Sweet & Savory Magic: The combo of maple and bacon is just… wow. You get that smoky crunch with a smooth, creamy filling in every bite.
- Perfect Mini Size: These cheesecakes are made in muffin tins, so they’re easy to serve, share, and pack for parties.
- Simple Ingredients: No need for fancy stuff or specialty shopping—most of these ingredients are pantry staples (or fridge regulars).
- Quick & Easy: You’ll have these ready in about an hour, so they’re great for last-minute gatherings or weeknight cravings.
- Crowd-Pleaser: Kids love them, adults sneak extra, and they always disappear fast at potlucks.
After making these mini maple bacon cheesecakes for birthdays, brunches, and more than a few movie nights, I can promise you they always get the same reaction: a surprised grin, a happy hum, and someone asking for the recipe. If you’ve ever tried just plain cheesecake bites, this sweet and savory version is a totally new experience. The bacon isn’t just sprinkled on top—it’s crisped to perfection and layered for texture. Plus, the maple syrup in the filling gives a subtle, cozy sweetness (not too sugary, just right).
What sets my recipe apart? I blend the cream cheese until it’s ultra-smooth, use thick-cut bacon for extra crunch, and balance the sweetness so you get a “wow” moment with every bite. It’s comfort food, but with a twist—easy enough for beginners, impressive enough for seasoned bakers. The first bite is always a little surprise, and the last one is never enough. If you want a recipe that’s fun, unique, and always a hit, this is it.
What Ingredients You Will Need
This recipe uses classic, easy-to-find ingredients (plus a few fun ones!) to create those epic mini maple bacon cheesecakes. Here’s what you’ll need:
- For the crust:
- 1 cup (100g) graham cracker crumbs (or digestive biscuits, crushed)
- 2 tbsp (28g) granulated sugar
- 4 tbsp (56g) unsalted butter, melted (adds richness)
- For the filling:
- 8 oz (226g) cream cheese, softened (full fat works best)
- 1/4 cup (60ml) pure maple syrup (not pancake syrup—real maple for flavor)
- 1/4 cup (50g) brown sugar (adds depth)
- 1 large egg, room temperature
- 1 tsp vanilla extract
- 1/4 cup (60g) sour cream (makes it extra creamy)
- Pinch of salt
- For the bacon topping:
- 4 slices thick-cut bacon (about 110g), cooked crispy and crumbled
- 1 tbsp (15ml) pure maple syrup (for glazing bacon)
- Optional:
- Chopped pecans or walnuts (for crunch)
- Extra maple syrup, for drizzling
If you’re gluten-free, swap the graham crackers for gluten-free cookies. For dairy-free needs, use plant-based cream cheese and sour cream (I’ve tried Kite Hill and it’s pretty good!). You can use turkey bacon if you prefer, but regular bacon gives the best flavor and crunch. If maple syrup isn’t in your pantry, honey works in a pinch (though it’s not quite the same, you know?).
I like to use Philadelphia cream cheese—it always gives a smooth texture. For maple syrup, go for Grade A amber if you can find it. And don’t skip the pinch of salt in the filling—it makes the flavors pop! If you want to go nut-free, just leave out the pecans. The recipe is pretty forgiving, so you can adjust to fit what you’ve got.
Equipment Needed
- Muffin tin (standard 12-cup is perfect, nonstick if possible)
- Paper or silicone muffin liners (helps with easy removal)
- Mixing bowls (one large, one small)
- Hand mixer or stand mixer (for smoothest cheesecake texture)
- Rubber spatula (for scraping every last bit)
- Measuring cups and spoons
- Small pan or skillet (to cook the bacon)
- Wire cooling rack
If you don’t have a stand mixer, a good old hand mixer works fine (I’ve used both and never noticed much difference for small batches). No muffin liners? Just grease your tin really well—though liners do make cleanup easier. For the bacon, I’ve tried baking and pan-frying; pan-frying gives the best crunch. The wire rack helps cool the cheesecakes evenly, but you can also just let them sit in the tin for a bit.
If you’re on a budget, most discount stores have basic muffin tins and mixing tools. Keep your hand mixer clean by wiping it after each use—cheesecake filling can get sticky! I’ve had my muffin pan for years, and it’s still going strong.
Preparation Method
- Preheat & Prep: Preheat your oven to 325°F (163°C). Line a 12-cup muffin tin with paper or silicone liners. Set aside.
- Make the Crust: In a small bowl, mix 1 cup (100g) graham cracker crumbs, 2 tbsp (28g) granulated sugar, and 4 tbsp (56g) melted unsalted butter until combined. The texture should feel like wet sand—press gently between your fingers. Spoon about 1 tablespoon (8g) of mixture into each muffin liner. Press down firmly (the bottom of a small glass works well). Bake for 5 minutes, then let cool.
- Cook the Bacon: In a skillet over medium heat, cook 4 slices thick-cut bacon until crispy (about 6–8 minutes). Drain and cool on paper towels. Once cool, crumble bacon and toss with 1 tbsp (15ml) pure maple syrup. Set aside for topping.
- Mix the Filling: In a large mixing bowl, beat 8 oz (226g) cream cheese with a hand mixer until smooth (about 2 minutes). Add 1/4 cup (60ml) maple syrup, 1/4 cup (50g) brown sugar, and 1 tsp vanilla extract. Beat again until fully combined. Add 1 large egg and 1/4 cup (60g) sour cream, then beat just until smooth—don’t overmix or it could crack later. Stir in a pinch of salt.
- Fill the Cups: Divide the cheesecake filling evenly among the crusts (about 2 tablespoons / 30g per cup). Smooth tops with a spatula. Sprinkle half the maple-glazed bacon over the filling.
- Bake: Bake for 17–20 minutes, until centers are just set but still a little jiggly in the middle. Edges should look slightly puffed. Don’t overbake—they’ll firm up as they cool.
- Cool: Cool in the pan for 10 minutes, then transfer to a wire rack. Refrigerate at least 2 hours (overnight is even better for flavor!).
- Top & Serve: Before serving, sprinkle remaining bacon on top. Drizzle with extra maple syrup if you like. Add nuts if using. Serve chilled.
Troubleshooting: If you see cracks, it’s usually from overmixing or baking too long. If the crust feels crumbly, press a bit harder next time. The filling should be silky, not grainy—room temp cream cheese helps! I like to do a quick taste test of the bacon before topping, just to make sure it’s nice and crisp. (A bit of quality control never hurts!)
Personal Tip: To save time, cook bacon while the crust is baking. Multitasking for the win! And use a cookie scoop for perfect, even cheesecake portions.
Cooking Tips & Techniques
- Room Temperature Ingredients: Always let your cream cheese and egg come to room temp. Cold cream cheese makes lumps, and cold eggs can cause the batter to split.
- Baking Time: Don’t trust your oven timer alone—check for a gentle jiggle in the center. Overbaking leads to dry, cracked cheesecakes.
- Bacon Crunch: Use thick-cut bacon and let it cool completely before adding maple syrup. If you add the syrup too soon, the bacon gets soft.
- Mixing Method: Beat the cream cheese first, then add other ingredients. Overmixing after adding the egg can cause the cheesecake to rise too much and sink.
- Crust Pressing: Press the crust firmly—if it’s too loose, it’ll crumble when you remove the mini cheesecakes.
I’ve learned the hard way that rushing the cooling step leads to messy bites (been there, done that, sticky fingers everywhere). Patience pays off here! Also, use a gentle hand when folding in mix-ins—vigorous stirring makes the filling tough.
If you want consistently smooth tops, tap the pan gently on the counter before baking to release air bubbles. For extra flavor, try adding a dash of cinnamon to the crust. And when it comes to bacon, make a bit extra—half of mine always gets “taste tested” before it ever reaches the cheesecakes.
Finally, if you’re making a double batch, rotate the muffin tin halfway through baking for even results. Little things make a big difference!
Variations & Adaptations
- Gluten-Free: Use gluten-free graham crackers or almond flour for the crust. Works just as well—sometimes even tastier!
- Dairy-Free: Swap in plant-based cream cheese and sour cream. I’ve tried this with Kite Hill, and it’s seriously good.
- Nutty Crunch: Add chopped pecans or walnuts to the crust or sprinkle on top for extra texture.
- Seasonal Twist: In fall, add a pinch of cinnamon and nutmeg to the filling. In summer, swap the bacon for candied pecans and drizzle with berry syrup.
- Flavor Customization: Try adding a swirl of caramel sauce to the filling, or use honey instead of maple syrup if you like a lighter sweetness.
If you prefer turkey bacon or want to avoid pork, that’s an easy swap (though you lose a bit of the classic smoky flavor). For egg allergies, you can substitute with a flaxseed “egg” (1 tbsp ground flax + 3 tbsp water, mixed and rested for 5 minutes). I once made a batch with chocolate chips in the filling—my nephew went nuts for it!
Don’t be afraid to mix and match toppings. I love tossing a few fresh berries on top in summer for color. If you’re planning for a holiday spread, double the maple and add a dash of cinnamon for an extra cozy vibe.
Serving & Storage Suggestions
Serve these mini maple bacon cheesecakes chilled, straight from the fridge. The creamy texture and crisp bacon are best when cold. Arrange on a platter for parties, or serve in cupcake wrappers for easy grab-and-go treats.
- Pair with: Fresh berries, whipped cream, or a drizzle of extra maple syrup. They’re great with hot coffee or a cold glass of milk.
- Storage: Store leftovers in an airtight container in the fridge for up to 5 days. The bacon stays crisp if you keep it separate and top just before serving.
- Freezing: Freeze (without bacon topping) for up to 2 months. Thaw overnight in the fridge, then add the bacon before serving.
- Reheating: These are best cold, but you can very gently warm in the microwave for 10 seconds if you prefer.
Honestly, the flavor gets even better after a day. The maple seeps into the cheesecake, and the crust softens just a little. If you’re prepping for a party, make them ahead—the stress-free kind of dessert everyone loves. They travel well, too!
Nutritional Information & Benefits
Each mini maple bacon cheesecake has approximately:
- Calories: 180
- Protein: 4g
- Fat: 12g
- Carbs: 16g
- Sugar: 9g
Maple syrup provides trace minerals and a natural sweetness, while cream cheese adds calcium and protein. Bacon brings a bit of protein and that irresistible savory flavor. If you opt for gluten-free or dairy-free versions, these values may vary a bit.
Allergens to watch: dairy, egg, gluten (unless you substitute), and nuts if added. I love that you can easily tweak this recipe for low-carb diets—just use a nut-based crust and sugar substitute. These cheesecakes are a fun way to satisfy cravings without going overboard.
Conclusion
Mini maple bacon cheesecakes are more than just a treat—they’re a sweet and savory experience that’s easy to make and impossible to resist. Whether you serve them at a party or enjoy them on a quiet night in, they bring a little joy to any table. You can customize the ingredients to suit your taste, swap toppings, and make them your own (that’s part of the fun!).
I keep coming back to this recipe because it’s honestly the perfect mix of comfort and creativity. If you try it, let me know how you adapt it—share your tweaks, your photos, or your favorite toppings in the comments! I love seeing how others put their own spin on these sweet and savory bites.
So go ahead, treat yourself and your crew. You’re about to discover a new favorite!
Frequently Asked Questions
Can I make mini maple bacon cheesecakes ahead of time?
Yes! Make them a day in advance and refrigerate. Just add the bacon topping right before serving for best crunch.
Can I use turkey bacon instead of regular bacon?
Absolutely. Turkey bacon works well, though the flavor is a bit milder and less smoky.
How do I know when the cheesecakes are done baking?
The centers should look set but still have a slight jiggle. If they’re firm all over, they’re likely overbaked.
Can I freeze these mini cheesecakes?
Yes! Freeze without bacon topping, then thaw in the fridge and add bacon before serving.
Are these mini maple bacon cheesecakes gluten-free?
They can be! Just use gluten-free graham crackers or almond flour for the crust.
Pin This Recipe!
Mini Maple Bacon Cheesecakes
These mini maple bacon cheesecakes combine a buttery graham cracker crust, creamy maple-infused cheesecake filling, and crispy bacon crumbles for the ultimate sweet and savory bite-sized treat. Perfect for parties, brunches, or whenever you want a unique dessert that’s easy to share and impossible to resist.
- Prep Time: 20 minutes
- Cook Time: 25 minutes
- Total Time: 2 hours 45 minutes
- Yield: 12 mini cheesecakes 1x
- Category: Dessert
- Cuisine: American
Ingredients
- 1 cup (100g) graham cracker crumbs (or digestive biscuits, crushed)
- 2 tbsp (28g) granulated sugar
- 4 tbsp (56g) unsalted butter, melted
- 8 oz (226g) cream cheese, softened
- 1/4 cup (60ml) pure maple syrup
- 1/4 cup (50g) brown sugar
- 1 large egg, room temperature
- 1 tsp vanilla extract
- 1/4 cup (60g) sour cream
- Pinch of salt
- 4 slices thick-cut bacon (about 110g), cooked crispy and crumbled
- 1 tbsp (15ml) pure maple syrup (for glazing bacon)
- Optional: Chopped pecans or walnuts
- Optional: Extra maple syrup, for drizzling
Instructions
- Preheat your oven to 325°F (163°C). Line a 12-cup muffin tin with paper or silicone liners.
- In a small bowl, mix graham cracker crumbs, granulated sugar, and melted butter until combined. Spoon about 1 tablespoon of mixture into each muffin liner and press down firmly. Bake for 5 minutes, then let cool.
- In a skillet over medium heat, cook bacon until crispy (about 6–8 minutes). Drain and cool on paper towels. Once cool, crumble bacon and toss with 1 tablespoon maple syrup. Set aside.
- In a large mixing bowl, beat cream cheese until smooth (about 2 minutes). Add maple syrup, brown sugar, and vanilla extract. Beat again until fully combined. Add egg and sour cream, then beat just until smooth. Stir in a pinch of salt.
- Divide the cheesecake filling evenly among the crusts (about 2 tablespoons per cup). Smooth tops with a spatula. Sprinkle half the maple-glazed bacon over the filling.
- Bake for 17–20 minutes, until centers are just set but still a little jiggly. Edges should look slightly puffed. Don’t overbake.
- Cool in the pan for 10 minutes, then transfer to a wire rack. Refrigerate at least 2 hours (overnight is better).
- Before serving, sprinkle remaining bacon on top. Drizzle with extra maple syrup if desired. Add nuts if using. Serve chilled.
Notes
For gluten-free, use gluten-free graham crackers or almond flour for the crust. For dairy-free, use plant-based cream cheese and sour cream. Turkey bacon can be substituted for regular bacon. Let cream cheese and egg come to room temperature for the smoothest filling. Don’t overmix after adding the egg to avoid cracks. Cool completely before chilling for best texture. Store in the fridge for up to 5 days or freeze (without bacon topping) for up to 2 months.
Nutrition
- Serving Size: 1 mini cheesecake
- Calories: 180
- Sugar: 9
- Sodium: 160
- Fat: 12
- Saturated Fat: 6
- Carbohydrates: 16
- Protein: 4
Keywords: mini cheesecake, maple bacon, sweet and savory dessert, party bites, brunch, easy cheesecake, bacon dessert, maple syrup, individual cheesecakes, muffin tin dessert