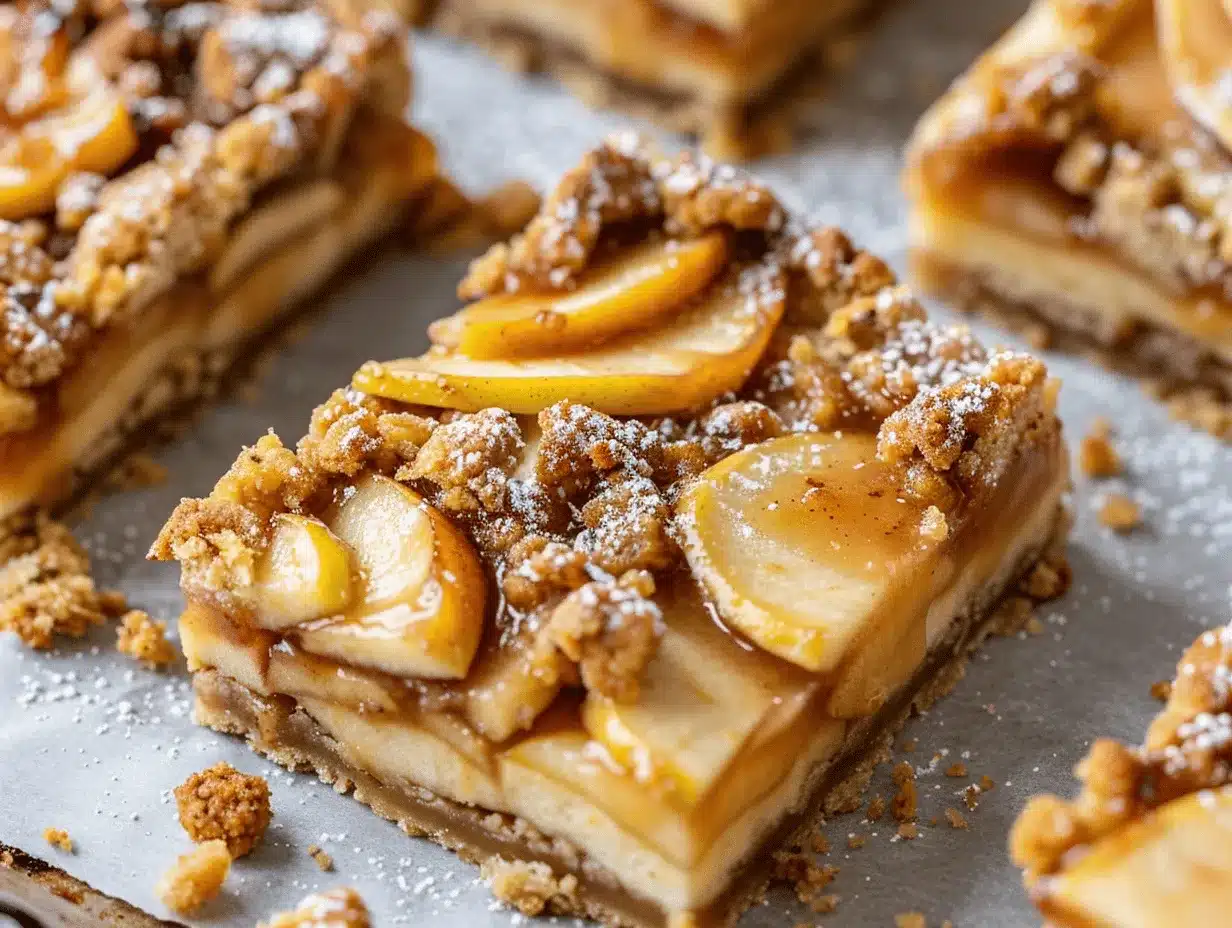
The waft of caramelized apples and buttery pastry from the oven—let’s be honest, that’s basically autumn in a nutshell. The first time I made these sheet pan apple pie bars, it was a chilly Saturday and I needed something easy (but still special) to share with friends. Instead of fussing over a traditional pie, I spread the dough in my biggest rimmed baking sheet and, wow, the results were golden, gooey, and downright addictive.
Sheet pan apple pie bars have become my go-to for fall—especially when I want homemade dessert without the marathon baking session. They’re simple but impressive, with layers of tender apples, cinnamon, and a crisp, buttery base that you can cut into neat, shareable squares. Perfect for potlucks, cozy family nights, or just satisfying that pie craving when you don’t have time to mess around with lattice tops. (You know you want a piece!)
I’ve baked these apple pie bars more times than I can count. Each time, a little tweak here or there—maybe a dash of cardamom, or a splash of lemon juice—makes them just right for the season. They remind me of my grandma’s kitchen, where the best desserts were always rustic, sweet, and made for sharing. Whether you’re a pie lover or just looking for a low-stress treat, you’ll find these bars are a shortcut to homemade comfort. Trust me, this recipe for sheet pan apple pie bars is totally worth making, and you’ll probably come back to it all season long.
Why You’ll Love This Recipe
After plenty of apple pie fails (dough too soft, filling too watery—you name it), these sheet pan apple pie bars are my sweet spot. Here’s why they stand out:
- Quick & Easy: No need to roll out finicky pie crusts—just press and bake. Ready in about an hour, so you can whip them up for impromptu gatherings or school nights.
- Simple Ingredients: Everything is pantry-friendly. Apples, flour, butter, sugar, and spices—classic, cozy, and no weird stuff.
- Perfect for Fall Parties: These bars slice up neatly, which means they’re ideal for sharing at tailgates, harvest festivals, or just with friends over coffee.
- Crowd-Pleaser: I’ve made these for picky eaters and dessert snobs alike, and everyone goes back for seconds. Kids love the sweet, cinnamon-y apple filling, and adults dig the flaky crust.
- Unbelievably Delicious: Think apple pie, but with extra crispy edges and gooey middle. The sheet pan style gives you more of those coveted golden crust corners, too.
This isn’t just another apple dessert. My technique—using melted butter for the crust and layering thinly sliced apples—creates a bar that’s sturdy enough to pick up, but still soft and rich inside. You get all the classic apple pie flavor, minus the tricky double crust. It’s comfort food with a twist, the kind you’ll want to make again and again.
Honestly? These sheet pan apple pie bars make dessert feel like less of a chore and more of a celebration. They’re the treat I rely on when I want to impress (without sweating it), and I promise, they’ll win you over after the first bite.
What Ingredients You Will Need
This recipe uses simple, wholesome ingredients to deliver bold flavor and satisfying texture without the fuss. Most are pantry staples, and the apples are easy to substitute based on what’s fresh and available.
- For the Crust & Topping:
- 2 cups (250g) all-purpose flour
- 3/4 cup (150g) granulated sugar
- 1/2 tsp salt
- 1 cup (226g) unsalted butter, melted (makes the crust super tender)
- 1 large egg, room temperature (helps bind everything)
- 1 tsp vanilla extract
- For the Apple Filling:
- 5 medium apples, peeled, cored, and thinly sliced (about 600g; Granny Smith for tartness, Honeycrisp for sweetness)
- 1/3 cup (65g) granulated sugar
- 1/3 cup (65g) light brown sugar (adds caramel notes)
- 1 tbsp lemon juice (keeps the apples bright)
- 2 tbsp all-purpose flour (thickens the filling)
- 1 1/2 tsp ground cinnamon
- 1/4 tsp ground nutmeg (optional, for warmth)
- 1/4 tsp ground cardamom (optional, adds a little something special)
- For the Glaze (Optional):
- 1 cup (120g) powdered sugar
- 2-3 tbsp milk or cream (use dairy-free if needed)
- 1/2 tsp vanilla extract
If you’re out of eggs, you can swap in 3 tbsp applesauce for binding. For gluten-free apple pie bars, use a trusted 1:1 gluten-free flour blend (I’ve had great results with Bob’s Red Mill). For a dairy-free option, sub the butter with plant-based margarine or coconut oil. Feel free to use whatever apples you love—just aim for a mix of tart and sweet for best flavor.
Don’t forget, you can add a handful of chopped pecans or walnuts to the topping for crunch. (Totally optional, but so good!)
Equipment Needed
- Sheet Pan (Half Size): 18×13-inch (45x33cm) rimmed baking sheet is perfect for this recipe. If you don’t have one, use two smaller pans and divide the dough.
- Parchment Paper: Makes removal and cleanup super easy. (I’ve tried greasing the pan, but parchment wins every time.)
- Mixing Bowls: At least two—one for crust, one for apples.
- Whisk & Spatula: For mixing the dough and folding the apples. A silicone spatula works best for spreading.
- Sharp Knife & Peeler: Thin slices cook faster and look prettier. An apple corer saves time, but not required.
- Measuring Cups & Spoons: Precision matters—especially for the crust.
If you don’t have a sheet pan, a 9×13-inch (23x33cm) casserole dish will work—the bars will be a bit thicker. I’ve used a silicone baking mat instead of parchment (easy clean-up), but parchment paper gives crispier edges. For budget-friendly options, the basic aluminum sheet pans from the supermarket do the job just fine. Pro tip: Let your pan cool before washing to avoid warping!
Preparation Method
- Preheat & Prep: Preheat your oven to 350°F (175°C). Line a half-sheet pan (18×13-inch) with parchment paper, leaving a little overhang for easy lifting later. This step saves your bars from sticking—trust me, you don’t want to skip it.
- Make the Crust: In a large bowl, whisk together 2 cups (250g) flour, 3/4 cup (150g) sugar, and 1/2 tsp salt. Pour in 1 cup (226g) melted butter, 1 egg, and 1 tsp vanilla extract. Mix until a soft dough forms. It’ll look a bit crumbly but should hold together when pressed. If too dry, add 1-2 tbsp milk.
- Press & Par-Bake Crust: Set aside 1/3 of the dough for the topping. Press the remaining dough evenly into the prepared pan, reaching all corners. Bake for 15 minutes, until just set and lightly golden. (Don’t overbake—it’ll finish cooking with the apples.)
- Prepare the Apple Filling: While the crust bakes, toss sliced apples with 1/3 cup (65g) granulated sugar, 1/3 cup (65g) brown sugar, 1 tbsp lemon juice, 2 tbsp flour, 1 1/2 tsp cinnamon, and any optional spices. The apples should glisten and smell like fall—if they seem dry, add a splash of water.
- Layer the Apples: Spread the apple mixture evenly over the par-baked crust. Try to lay slices flat for a uniform texture. If you have extra apples, tuck them in—more is more here!
- Add the Topping: Crumble the reserved dough over the apples. It won’t cover completely, but that’s okay—little pockets of apples peeking through make it look rustic and delicious.
- Bake: Return to the oven and bake for 30–35 minutes, until the top is golden brown and the apples are bubbling. Rotate the pan halfway for even browning. (If edges brown too quickly, tent with foil.)
- Cool: Let the bars cool in the pan for at least 30 minutes. They’ll firm up as they cool, making slicing easier. The house will smell amazing—resist the urge to cut too soon!
- Optional Glaze: Whisk 1 cup (120g) powdered sugar with 2–3 tbsp milk and 1/2 tsp vanilla. Drizzle over cooled bars. (If the glaze is too thick, add more milk. Too thin? More sugar.)
- Slice & Serve: Lift the bars out using the parchment overhang. Cut into squares or rectangles. Serve warm or at room temperature.
If your crust cracks when pressing, just patch it—it’ll bake up fine. If your apples are extra juicy, increase the flour in the filling by 1 tbsp. For extra crispy topping, bake an extra 5 minutes. My favorite tip: slice bars with a serrated knife for clean edges.
Cooking Tips & Techniques
I’ve learned a few tricks (the hard way) that make these sheet pan apple pie bars foolproof:
- Thin Apple Slices: Use a mandolin or sharp knife for uniform slices. Thick chunks take longer to soften and can make the bars watery.
- Par-Bake Crust: Baking the bottom crust first keeps it from getting soggy. One time, I skipped this and ended up with a mushy mess—never again!
- Rotate the Pan: Ovens have hot spots. I always rotate the sheet pan halfway through baking for even browning.
- Watch the Topping: If the top starts browning too fast, loosely cover with foil. This keeps the apples juicy and the crust perfect.
- Cool Completely: Bars slice best when cool. If you’re impatient (I get it), chill them in the fridge for 15 minutes before cutting.
- Multitasking: While the crust bakes, prep the apples and glaze. Saves time and keeps cleanup minimal.
- Consistency Counts: Measure flour by weight for accuracy. Too much flour makes the crust dry; too little, too soft.
Don’t worry if your bars look rustic—imperfections add charm. The main mistake? Underbaking. If the apples aren’t bubbling, give it a few more minutes. After dozens of batches, I’ve found these little tweaks mean you get perfect sheet pan apple pie bars every time.
Variations & Adaptations
One of the best things about sheet pan apple pie bars is how easy it is to switch things up:
- Gluten-Free: Use a 1:1 gluten-free flour blend. I’ve made these with almond flour for a nutty twist—just add an extra egg for binding.
- Dairy-Free: Swap the butter for coconut oil or a plant-based margarine. The flavor is a little different, but still rich.
- Seasonal Fruit: Try pears, peaches, or even plums instead of apples. In summer, add a handful of blueberries for a fresh pop.
- Flavor Boosters: Mix in a handful of dried cranberries, chopped walnuts, or a sprinkle of orange zest with the apples.
- Spice It Up: For a chai vibe, add ground ginger and allspice.
Personally, my favorite twist is adding caramel drizzle and a pinch of flaky sea salt on top after baking—kind of like a caramel apple pie bar. If you need nut-free, skip the nuts, and if eggs are a concern, applesauce works as a binder. You can also bake these in muffin tins for individual apple pie bites. Try your own mix and match—these bars are super forgiving!
Serving & Storage Suggestions
These sheet pan apple pie bars taste best slightly warm or at room temperature. I like to serve them on a big platter, dusted lightly with powdered sugar or a drizzle of glaze. For an extra cozy touch, pair with vanilla ice cream or whipped cream (you can’t go wrong!).
They’re great alongside coffee or apple cider—perfect for brunch or as a sweet snack after school. If you’re bringing them to a party, stack squares between layers of parchment in a lidded container.
For storage, keep bars in an airtight container at room temperature for up to 2 days. For longer keeping, refrigerate for up to 5 days (just let them come to room temp before serving for best texture). You can freeze individual bars—wrap tightly and store for up to 2 months. Reheat in a low oven (300°F/150°C) for 5–10 minutes to revive the crispness. Honestly, the flavors mellow and deepen a bit over time, so don’t be afraid to make them ahead.
Nutritional Information & Benefits
Each sheet pan apple pie bar (based on 24 bars) contains approximately:
- Calories: 180
- Fat: 8g
- Carbohydrates: 25g
- Protein: 2g
- Fiber: 2g
Apples are naturally high in fiber and vitamin C, making these bars a slightly better-for-you treat compared to traditional pie. If you use whole grain or nut flours, you boost the nutrition even more. The recipe is nut-free as written, but you can add nuts for healthy fats. For gluten-free diets, a flour blend works beautifully. Dairy-free swaps are easy. Always check for allergens if sharing!
I love that these bars offer a taste of homemade comfort without going overboard on sugar. They’re a cozy way to get your apple fix, and a balanced treat for fall.
Conclusion
There’s something really special about pulling a big batch of sheet pan apple pie bars from the oven—the golden crust, bubbling apples, and that cinnamon scent filling the kitchen. This recipe is the shortcut to homemade pie flavor, with way less hassle and all the love. You can tweak it to suit your family, your pantry, or your mood, and every time you’ll get a treat that feels like autumn in every bite.
I hope these bars become a staple in your kitchen like they have in mine. Whether you make them for a crowd or just for yourself (no judgment!), don’t be afraid to try your own twists and share your results. Leave a comment below if you bake these, or tag me with your apple pie bar creations—I’d love to see how you make them your own!
So, grab your apples and a sheet pan, and let’s make something delicious. Happy baking, friends!
Frequently Asked Questions
Can I use pre-made pie crust for the base?
You can, but the texture will be different. The homemade crust is more like a shortbread, which holds up better for bars. Pre-made dough is a quick fix in a pinch though!
What kind of apples work best for sheet pan apple pie bars?
Granny Smith for tartness, Honeycrisp for sweetness. Mixing varieties gives the best flavor and texture. Most firm apples will work.
How do I prevent soggy crust?
Par-bake the crust before adding the apples. Also, sprinkle a little extra flour over very juicy apples to soak up moisture.
Can I make these bars ahead of time?
Absolutely! They store well for several days and can be frozen. The flavor actually improves a bit after resting overnight.
Are these bars gluten-free or dairy-free?
They’re easily adaptable! Use a gluten-free flour blend and swap the butter for coconut oil or margarine. Check the notes in the recipe for more tips.
Pin This Recipe!
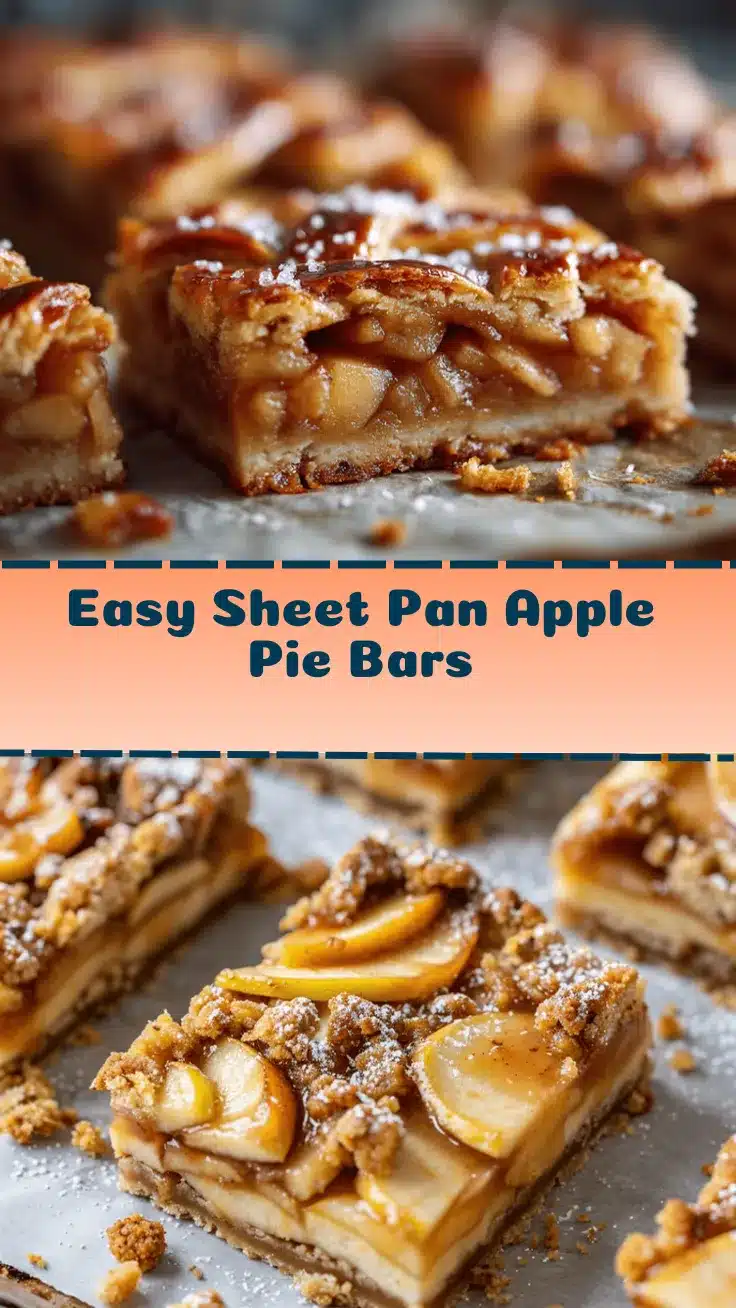
Sheet Pan Apple Pie Bars
These easy sheet pan apple pie bars feature layers of tender apples, cinnamon, and a crisp, buttery base. Perfect for fall gatherings, potlucks, or cozy family nights, they deliver all the flavor of homemade apple pie with less fuss and more shareable squares.
- Prep Time: 20 minutes
- Cook Time: 45 minutes
- Total Time: 1 hour 5 minutes
- Yield: 24 bars 1x
- Category: Dessert
- Cuisine: American
Ingredients
- 2 cups all-purpose flour
- 3/4 cup granulated sugar
- 1/2 tsp salt
- 1 cup unsalted butter, melted
- 1 large egg, room temperature
- 1 tsp vanilla extract
- 5 medium apples, peeled, cored, and thinly sliced (Granny Smith and Honeycrisp recommended)
- 1/3 cup granulated sugar
- 1/3 cup light brown sugar
- 1 tbsp lemon juice
- 2 tbsp all-purpose flour
- 1 1/2 tsp ground cinnamon
- 1/4 tsp ground nutmeg (optional)
- 1/4 tsp ground cardamom (optional)
- 1 cup powdered sugar (for glaze, optional)
- 2–3 tbsp milk or cream (for glaze, optional)
- 1/2 tsp vanilla extract (for glaze, optional)
Instructions
- Preheat oven to 350°F (175°C). Line a half-sheet pan (18×13-inch) with parchment paper, leaving overhang for easy lifting.
- In a large bowl, whisk together 2 cups flour, 3/4 cup sugar, and 1/2 tsp salt. Pour in melted butter, egg, and 1 tsp vanilla extract. Mix until a soft dough forms. If too dry, add 1-2 tbsp milk.
- Set aside 1/3 of the dough for topping. Press remaining dough evenly into prepared pan. Bake for 15 minutes, until just set and lightly golden.
- While crust bakes, toss sliced apples with 1/3 cup granulated sugar, 1/3 cup brown sugar, 1 tbsp lemon juice, 2 tbsp flour, 1 1/2 tsp cinnamon, and optional spices. If dry, add a splash of water.
- Spread apple mixture evenly over par-baked crust, laying slices flat.
- Crumble reserved dough over apples. It won’t cover completely.
- Return to oven and bake for 30–35 minutes, until top is golden brown and apples are bubbling. Rotate pan halfway for even browning. Tent with foil if edges brown too quickly.
- Let bars cool in pan for at least 30 minutes before slicing.
- Optional: Whisk 1 cup powdered sugar with 2–3 tbsp milk and 1/2 tsp vanilla. Drizzle over cooled bars.
- Lift bars out using parchment overhang. Cut into squares or rectangles. Serve warm or at room temperature.
Notes
For gluten-free bars, use a 1:1 gluten-free flour blend. For dairy-free, substitute butter with coconut oil or plant-based margarine. Applesauce can replace egg for binding. Add chopped nuts to topping for crunch. Slice bars with a serrated knife for clean edges. Bars store well at room temperature for 2 days, refrigerated for 5 days, or frozen for up to 2 months.
Nutrition
- Serving Size: 1 bar (1/24th of recipe)
- Calories: 180
- Sugar: 15
- Sodium: 80
- Fat: 8
- Saturated Fat: 5
- Carbohydrates: 25
- Fiber: 2
- Protein: 2
Keywords: apple pie bars, sheet pan dessert, fall baking, easy apple dessert, homemade apple bars, autumn recipes, potluck dessert, cinnamon apple bars