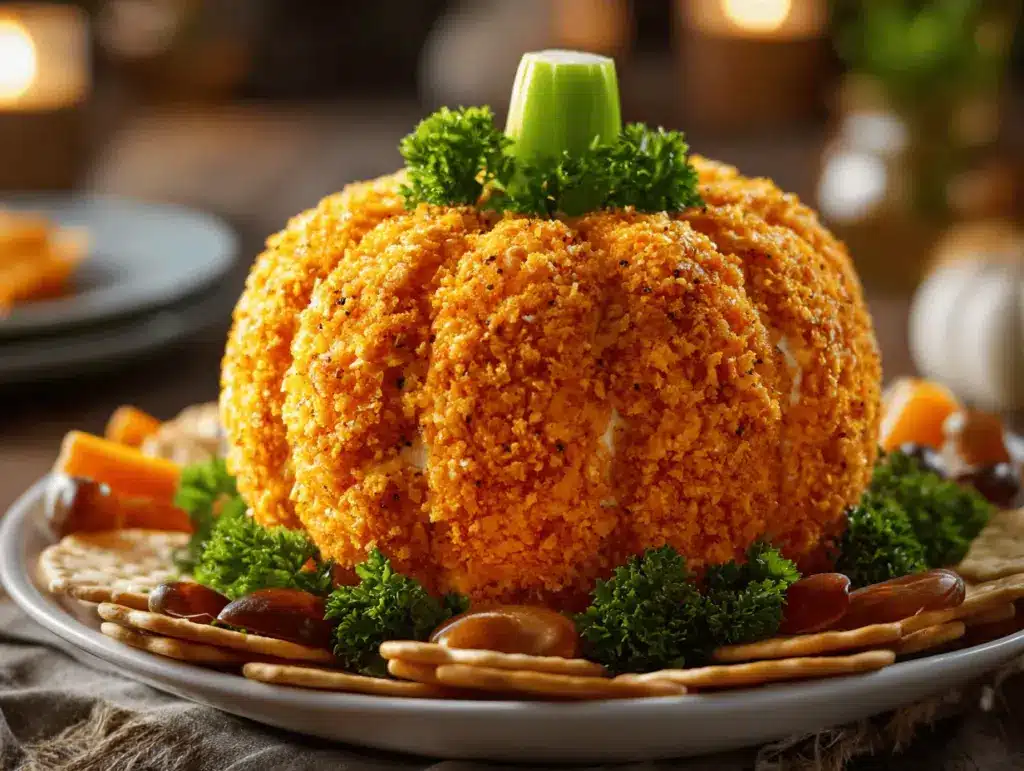
The first time I brought this pumpkin shaped cheese ball to a fall get-together, everyone’s face lit up before they even tasted it. There’s just something about a savory cheese ball disguised as a cute pumpkin that makes people smile, you know? That pop of orange on the appetizer table is a total conversation starter, and honestly, I’ve never had any leftovers to bring home (which is both a blessing and a tiny heartbreak).
This pumpkin shaped cheese ball recipe has become my go-to for autumn parties, Halloween gatherings, Thanksgiving, and even Friendsgiving potlucks. It’s ridiculously easy to make, but it looks like you spent hours crafting it—total hostess magic. I first stumbled on this idea when I was searching for a fun way to jazz up a classic cheese ball for my family’s annual harvest party. One year, I ran out of time for elaborate appetizers, grabbed some paprika and a bell pepper stem, and voilà—the pumpkin cheese ball was born.
Besides the adorable look, this cheese ball is packed with creamy, tangy, and savory flavors. It’s loaded with cheddar, cream cheese, green onions, and a hit of garlic powder, all wrapped up in a bright orange coating. It’s the kind of appetizer that’s perfect for munching while catching up with friends, and it works with everything from crackers to veggie sticks. If you’re looking for something festive, crowd-pleasing, and (let’s face it) totally Pinterest-worthy, you’ve found your new favorite party trick. After making this more times than I can count, I can honestly say it’s a must for any fall celebration!
Why You’ll Love This Recipe
- Visually Stunning: This pumpkin shaped cheese ball is a showstopper. It’s bright, cheerful, and looks exactly like a mini pumpkin sitting on your table. Guests will “ooh” and “aah” before they even dig in.
- Easy to Make: Don’t let the festive look fool you—this recipe comes together in about 15 minutes (plus some chill time). No fancy kitchen gadgets or tricky techniques required.
- Simple, Accessible Ingredients: Everything you need is available at any grocery store. There’s a good chance you already have most of the ingredients in your fridge or pantry.
- Perfect for Parties: Whether it’s a Halloween bash, Thanksgiving dinner, or a cozy fall movie night, this cheese ball fits right in. It’s easy to transport for potlucks, too!
- Crowd-Pleasing Flavors: Creamy, sharp, and just a hint of tang—this cheese ball has it all. Even picky eaters go back for seconds (and thirds, if you’re not watching).
- Make Ahead: You can prep the pumpkin cheese ball a day (or even two) ahead of time. Just shape, wrap, and chill—then decorate right before serving. It’s honestly a lifesaver when you’re juggling a busy party menu.
- Customizable: Want it spicy? Add some diced jalapeños. Prefer smoky flavors? Try smoked paprika. There’s plenty of room to make this cheese ball your own.
What really sets this pumpkin cheese ball apart is the texture and flavor balance. I blend my cheeses just enough for a smooth, creamy base, but I leave a few bits of cheddar for a little bite. The orange coating is paprika, which adds a subtle warmth and a gorgeous color—way better than food dye. For the “pumpkin stem,” you just use a bell pepper stem or a pretzel rod. It’s the kind of appetizer that makes people think you’re a kitchen genius, even when you’re just having fun. My friends ask for it every year, and my kids love helping shape the “pumpkin”—it’s a family tradition at this point!
What Ingredients You Will Need
This pumpkin shaped cheese ball uses simple, reliable ingredients you can find anywhere. The flavors are bold, creamy, and savory—perfect for snacking all night long. Here’s what you’ll need:
- Cream Cheese (16 oz / 450g, softened): This is the backbone of the cheese ball. You want it nice and soft so it blends easily—leave it on the counter for an hour before mixing.
- Sharp Cheddar Cheese (2 cups / 200g, freshly shredded): The sharper the better for big flavor. I use Cabot or Tillamook, but any good block cheddar works. Pre-shredded is convenient, but blocks melt and blend smoother.
- Green Onions (2, finely chopped): Adds a pop of color and a gentle onion bite. You can swap for chives if you prefer a milder flavor.
- Garlic Powder (1 tsp): Gives a savory boost without being overwhelming.
- Worcestershire Sauce (1½ tsp): For a hint of umami and depth. If you’re vegetarian, swap for tamari or coconut aminos.
- Hot Sauce (½ tsp, optional): Adds a little kick—Tabasco or Frank’s are my go-tos.
- Salt and Pepper (to taste): I start with ¼ tsp salt and a few cracks of pepper, then adjust after mixing.
- Paprika (3-4 tbsp): For rolling and coating. Regular paprika gives that bright orange pumpkin color. Smoked paprika is delicious if you like a smoky twist.
- Bell Pepper Stem (from 1 bell pepper): For the pumpkin “stem.” Just cut off the stem end and save it. You can also use a pretzel rod or a broccoli floret if you’re in a pinch—whatever looks cute!
- Optional Mix-Ins:
- Chopped pecans or walnuts (½ cup) for a little crunch
- Cooked, crumbled bacon (¼ cup) for a savory, smoky touch
- Fresh herbs like parsley or dill (2 tbsp) for extra freshness
- Shredded pepper jack or Monterey Jack for a cheese blend
If you’re making this for folks with dairy allergies, try dairy-free cream cheese (like Kite Hill) and a vegan cheddar. For a gluten-free option, double-check your Worcestershire sauce and hot sauce labels. Honestly, this cheese ball is super forgiving—don’t stress if you need to swap or skip an ingredient. I’ve made it with a little leftover ranch seasoning once, and it was still a hit!
Equipment Needed
- Mixing Bowl: A medium or large bowl works best—metal or glass is easier to clean if your cheese gets sticky.
- Hand Mixer or Sturdy Spoon: A hand mixer makes quick work of blending everything, but a good wooden spoon and some elbow grease work in a pinch.
- Plastic Wrap: For shaping and chilling the cheese ball. If you don’t have plastic wrap, a clean silicone baking mat or parchment paper works too.
- Measuring Cups and Spoons: For nailing those cheese and seasoning ratios.
- Rubber Spatula: Helps you scrape every last bit of cheesy goodness from the bowl.
- Small Plate or Serving Board: For shaping, chilling, and serving your pumpkin cheese ball.
- Knife and Cutting Board: For chopping green onions, bell pepper stem, and any mix-ins.
I’ve made this cheese ball with just a spoon and some parchment when I was at a friend’s house—no fancy tools needed. If your cheese sticks to the bowl, rinse with warm water before cleaning to make life easier. For budget-friendly options, your local dollar store has mixing bowls and spatulas that get the job done just fine!
How to Make a Pumpkin Shaped Cheese Ball
-
Soften the Cream Cheese (about 1 hour):
Take 16 oz (450g) of cream cheese out of the fridge and let it sit at room temperature. Softening makes it way easier to mix and shape—trust me, don’t rush this step. -
Mix the Base (5 minutes):
In your mixing bowl, combine the softened cream cheese and 2 cups (200g) of shredded sharp cheddar. Use a hand mixer on low or a sturdy spoon. Mix until mostly smooth—some cheddar bits are fine. -
Add the Flavor (2 minutes):
Stir in 2 finely chopped green onions, 1 tsp garlic powder, 1½ tsp Worcestershire sauce, ½ tsp hot sauce (if using), and ¼ tsp salt. Add a few cracks of black pepper. Taste and adjust—if you want more tang or kick, add a dash more Worcestershire or hot sauce. -
Mix in Optional Goodies (2 minutes):
If using, fold in ½ cup chopped pecans, ¼ cup crumbled bacon, or 2 tbsp fresh herbs. Don’t overmix—just enough to distribute. -
Shape the Cheese Ball (2 minutes):
Lay a large piece of plastic wrap on your counter. Scoop the cheese mixture into the center. Gather up the wrap and twist to form a tight ball. Use your hands to smooth and round it as much as possible. -
Chill Until Firm (at least 1 hour, up to 24 hours):
Place the wrapped cheese ball on a small plate. Chill in the fridge until it’s firm—at least 1 hour. Overnight is even better for flavor! -
Unwrap and Decorate (5 minutes):
Unwrap your chilled cheese ball. Place it on your serving board. Sprinkle 3-4 tbsp paprika evenly over the top, pressing lightly to coat all sides (use your hands or a clean pastry brush). If the cheese ball is sticky, sprinkle a little paprika on your hands to help. -
Create Pumpkin Ridges (2 minutes):
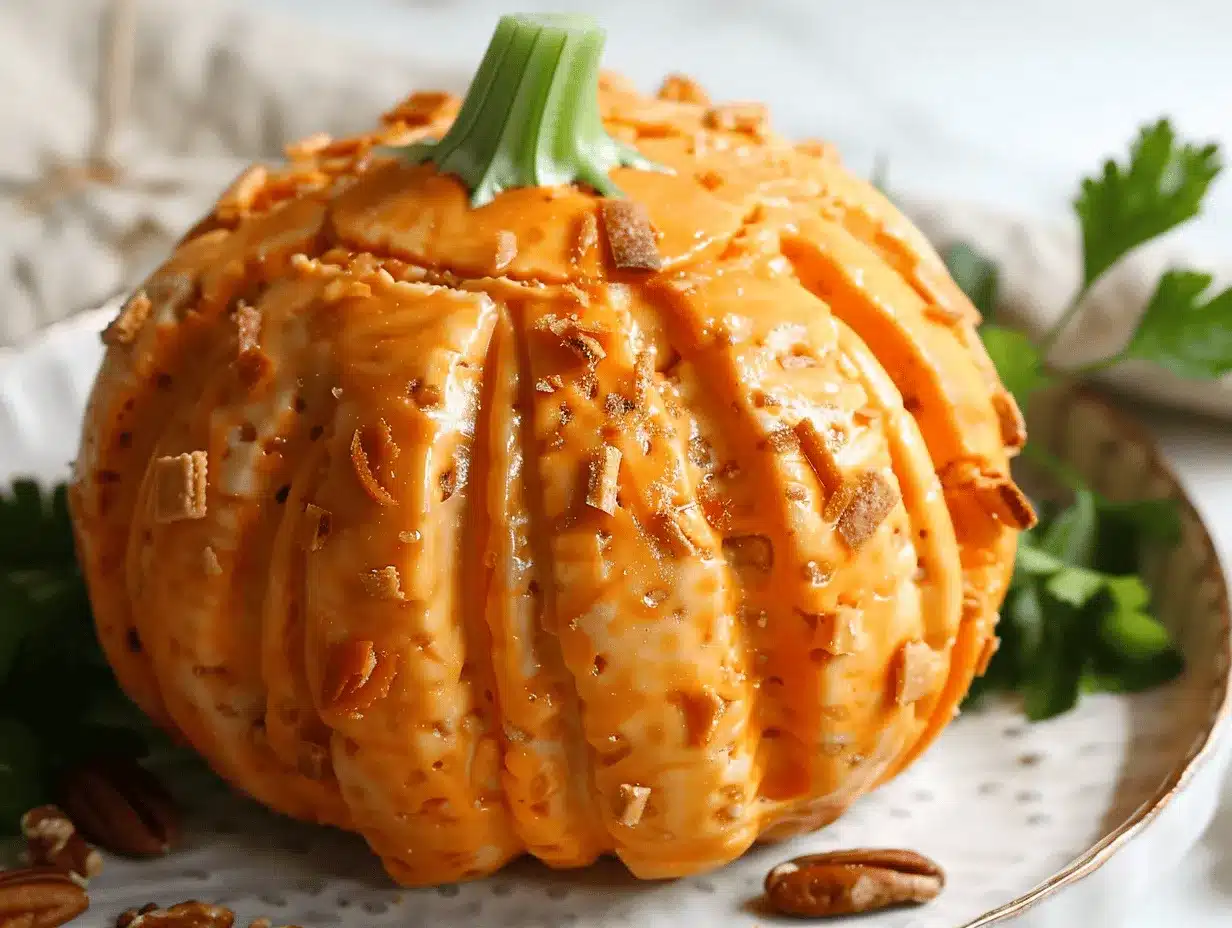
Using kitchen twine, press gently around the cheese ball to make indentations, mimicking pumpkin ridges. Don’t pull too tight or you’ll split the ball! You can also use a chopstick or the back of a butter knife to make grooves. -
Add the Stem (1 minute):
Take the stem from a bell pepper and press it into the top of the cheese ball to complete the pumpkin look. If you don’t have a stem, use a pretzel rod or a broccoli floret. -
Chill Again or Serve:
For best results, chill the decorated cheese ball for another 30 minutes before serving. This helps it keep its shape, especially if your kitchen is warm.
Tip: If your cheese ball mixture feels too soft to shape, pop it in the fridge for 10-15 minutes, then try again. If it cracks a little while shaping, just smooth it over with your hands or a spatula—it’s very forgiving! The paprika coating hides imperfections, and the “pumpkin” look is charming even if your ridges aren’t perfect.
Cooking Tips & Techniques
- Use Room Temperature Ingredients: Cold cream cheese is a pain to blend and shape. Letting everything come to room temp means a smoother, creamier cheese ball (and less arm workout for you).
- Shred Your Own Cheese: Pre-shredded cheese is coated with anti-caking agents that can make your cheese ball a little dry and grainy. Grating your own block cheddar takes an extra minute, but it’s totally worth it for the creamy texture.
- Don’t Overmix: Once your cheeses and seasonings are combined, stop mixing—overworking can make your cheese ball dense. A few chunky bits are good!
- Chill for Flavor and Structure: Letting the cheese ball sit in the fridge for at least an hour helps the flavors meld and the mixture firm up. If you try to shape or coat it while it’s still soft, it’ll squish everywhere (learned this one the hard way… several times).
- Coating Evenly: Paprika sticks best if you sprinkle it on while the cheese ball is still a little tacky. If it’s too dry, brush it with a tiny bit of water first. Use a clean, dry hand to gently press the paprika around the sides.
- Shaping the Pumpkin: Don’t stress about perfect grooves—just a few gentle presses with twine, a butter knife, or even your pinky finger do the trick. Nature’s pumpkins are quirky, so yours can be too!
- Avoid Overcrowding the Board: Leave space around your cheese ball for crackers, veggies, and easy scooping. It’s tempting to load up your board, but a little breathing room makes it easier for guests to grab a bite.
I’ve definitely tried to rush this recipe before and ended up with a lopsided “pumpkin” that still tasted amazing. The biggest lesson? If your cheese ball looks a little wonky, just call it “rustic.” People will love it anyway!
Variations & Adaptations
- Spicy Jalapeño Pumpkin Cheese Ball: Add 1-2 finely diced jalapeños (seeds removed for less heat) and a pinch of cayenne to the cheese mixture. Swap half the cheddar for pepper jack for extra kick.
- Herb & Ranch Version: Mix in 2 tbsp ranch seasoning and 2 tbsp chopped fresh parsley or dill. This is a hit with kids and ranch lovers—just skip the Worcestershire for a milder flavor.
- Nut-Free Cheese Ball: Omit nuts entirely or swap for crunchy pumpkin seeds inside or pressed on the outside. Sunflower seeds work great too.
- Dairy-Free/Vegan Option: Use dairy-free cream cheese (like Kite Hill or Tofutti) and your favorite vegan cheddar. Replace Worcestershire with tamari or coconut aminos for a totally plant-based appetizer.
- Mini Pumpkin Cheese Balls: Divide the mixture into golf-ball sized portions, shape, and coat individually. Perfect for grab-and-go party bites!
I once tried a “dessert” twist by swapping in honey goat cheese and a sprinkle of cinnamon sugar for a Halloween-themed sweet cheese ball. It was surprisingly good with graham crackers! Don’t be afraid to play with the mix-ins—sometimes the best recipes start as happy accidents.
Serving & Storage Suggestions
For the cutest presentation, serve your pumpkin shaped cheese ball on a wooden board surrounded by crackers, toasted baguette slices, carrot sticks, celery, and pretzels. I like to scatter a few extra bell pepper pieces or fresh herbs around for extra color. Serve it chilled or just slightly cool—too warm, and it’ll get a bit too soft to hold its shape.
If you’re pairing with drinks, this cheese ball goes great with apple cider, a crisp white wine, or a pumpkin ale. It’s also amazing with a side of sliced apples or pears for a sweet-savory combo.
Leftovers (if you have any!) will keep wrapped tightly in plastic wrap in the refrigerator for up to 4 days. To freeze, wrap the uncoated cheese ball in plastic and then foil—freeze for up to a month. Thaw in the fridge overnight, then roll in paprika and decorate before serving. For the best texture, don’t freeze after you’ve added the paprika or the stem.
To freshen up leftovers, let the cheese ball sit at room temperature for 20 minutes, then give it a gentle roll in more paprika if needed. The flavors actually get even better after a night in the fridge as they meld together!
Nutritional Information & Benefits
This pumpkin shaped cheese ball is rich, creamy, and packed with protein and calcium thanks to the cream cheese and cheddar. Each 2-tablespoon serving has roughly 100 calories, 3g protein, and 8g fat. It’s naturally low in carbs (about 2g per serving), making it a great appetizer option for low-carb and keto diets—just serve with veggie dippers!
The green onions add a dose of vitamin K and antioxidants, while paprika brings a gentle anti-inflammatory boost. If you use fresh herbs or nuts, you’ll get extra vitamins and healthy fats. Always double-check for dairy and tree nut allergens if serving to a crowd.
Personally, I love how this cheese ball satisfies snack cravings without being heavy or greasy. It’s a fun way to sneak in some extra protein on a party platter, and you can boost fiber by serving with fresh veggies. Just remember: it’s still an indulgent treat, so enjoy every cheesy bite!
Conclusion
If you’re searching for the kind of appetizer that gets everyone talking and makes your party table pop, this pumpkin shaped cheese ball is honestly the answer. It’s easy, festive, and can be customized a dozen ways to suit your tastes or dietary needs. Plus, it’s just fun to make—especially if you let the kids help shape those pumpkin ridges!
I love this recipe because it’s a tradition in my house now, and it never fails to bring a smile to guests’ faces. Don’t be afraid to play with the flavors, swap in your favorite cheeses, or try a few new mix-ins. The best part? You can make it ahead and enjoy your own party without last-minute stress.
If you give this pumpkin shaped cheese ball a try, let me know how it goes! Share your photos, variations, or any happy accidents in the comments—I’d love to see your creations. Happy fall feasting, and may your appetizer table always be the most festive in the room!
Frequently Asked Questions
How far ahead can I make the pumpkin shaped cheese ball?
You can prepare the cheese ball up to 2 days in advance. Just keep it wrapped tightly in plastic wrap in the fridge, then coat and decorate right before serving for the freshest look.
What’s the best way to get the bright orange color?
Use regular (not smoked) paprika for the most vibrant orange hue. Roll the chilled cheese ball in a generous layer and gently press it on for even coverage.
Can I freeze the cheese ball?
Yes! You can freeze the uncoated cheese ball for up to 1 month. Thaw overnight in the fridge, then roll in paprika and add the stem before serving. Freezing after decorating isn’t recommended as the color and texture may change.
What can I use instead of a bell pepper stem for the “pumpkin” top?
If you don’t have a bell pepper stem, a pretzel rod, a broccoli floret, or even a piece of celery works great as a cute stand-in. Use whatever looks festive and fun!
Is this recipe gluten-free?
The cheese ball itself is gluten-free as long as you check your hot sauce and Worcestershire labels. Just be sure to serve with gluten-free crackers or veggie sticks if needed.
Pin This Recipe!
Pumpkin Shaped Cheese Ball Recipe – Easy Festive Party Appetizer

This festive pumpkin shaped cheese ball is a creamy, tangy, and savory party appetizer that’s visually stunning and easy to make. Perfect for autumn gatherings, Halloween, Thanksgiving, or Friendsgiving, it’s loaded with cheddar, cream cheese, green onions, and garlic powder, all wrapped in a bright orange paprika coating.
- Prep Time: 15 minutes
- Cook Time: 0 minutes
- Total Time: 1 hour 45 minutes
- Yield: 10-12 servings 1x
- Category: Appetizer
- Cuisine: American
Ingredients
- 16 oz cream cheese, softened
- 2 cups sharp cheddar cheese, freshly shredded
- 2 green onions, finely chopped
- 1 tsp garlic powder
- 1 1/2 tsp Worcestershire sauce (or tamari/coconut aminos for vegetarian)
- 1/2 tsp hot sauce (optional)
- 1/4 tsp salt, plus more to taste
- Black pepper, to taste
- 3–4 tbsp paprika (for coating)
- Stem from 1 bell pepper (or pretzel rod/broccoli floret for decoration)
- Optional mix-ins: 1/2 cup chopped pecans or walnuts, 1/4 cup cooked crumbled bacon, 2 tbsp fresh herbs (parsley or dill), shredded pepper jack or Monterey Jack cheese
Instructions
- Take cream cheese out of the fridge and let it soften at room temperature for about 1 hour.
- In a mixing bowl, combine softened cream cheese and shredded cheddar cheese. Mix until mostly smooth, leaving some cheddar bits.
- Stir in chopped green onions, garlic powder, Worcestershire sauce, hot sauce (if using), salt, and black pepper. Taste and adjust seasonings as needed.
- Fold in any optional mix-ins (nuts, bacon, herbs, or additional cheese) if desired.
- Lay a large piece of plastic wrap on the counter. Scoop the cheese mixture into the center and gather up the wrap, twisting to form a tight ball. Smooth and round with your hands.
- Place the wrapped cheese ball on a small plate and chill in the fridge until firm, at least 1 hour (up to 24 hours for best flavor).
- Unwrap the chilled cheese ball and place on a serving board. Sprinkle paprika evenly over the top and sides, pressing lightly to coat.
- Use kitchen twine, a chopstick, or the back of a butter knife to gently press indentations around the cheese ball, mimicking pumpkin ridges.
- Press the bell pepper stem (or pretzel rod/broccoli floret) into the top to complete the pumpkin look.
- Chill the decorated cheese ball for another 30 minutes before serving for best shape, or serve immediately.
Notes
For best texture, use room temperature ingredients and shred your own cheese. Chill the cheese ball well before shaping and coating. Customize with spicy, nutty, or herb mix-ins. Serve with crackers, veggie sticks, or baguette slices. Cheese ball can be made ahead and keeps well in the fridge for up to 4 days. For a vegan version, use dairy-free cream cheese and cheddar, and tamari instead of Worcestershire.
Nutrition
- Serving Size: 2 tablespoons
- Calories: 100
- Sugar: 1
- Sodium: 180
- Fat: 8
- Saturated Fat: 5
- Carbohydrates: 2
- Protein: 3
Keywords: cheese ball, pumpkin appetizer, fall party, Halloween, Thanksgiving, Friendsgiving, festive appetizer, easy cheese ball, party snack, autumn recipe



